> ## Documentation Index
> Fetch the complete documentation index at: https://moengage-docs-limits-personalize.mintlify.site/llms.txt
> Use this file to discover all available pages before exploring further.
# Shopflo
[Shopflo](https://www.shopflo.com/) is a checkout platform that enhances the customer experience for e-commerce stores. This provides a seamless, fast, and intuitive checkout process, helping businesses increase conversion rates and reduce cart abandonment.
## MoEngage × Shopflo
The integration of MoEngage and Shopflo enhances customer engagement by sending crucial checkout journey events. This data allows you to gain deeper insights into user behavior, create more effective segments, and trigger personalized campaigns that boost conversions and foster customer loyalty. With this integration, you can:
* Track user progress through the checkout funnel in real-time.
* Update user profiles in MoEngage with customer data collected during checkout.
* Trigger automated workflows for events like abandoned checkouts or completed orders.
* Create granular user segments based on checkout actions and purchase data.
## Use Cases
Integrating Shopflo with MoEngage helps you with the following use cases:
* **Recover abandoned carts** : Automatically send timely reminders via push notification, email, or SMS to users who abandon their carts, encouraging them to complete their purchase.
* **Post-purchase engagement** : Automatically trigger campaigns to welcome new customers, request product reviews, offer loyalty rewards, or suggest related products based on their recent purchase
* **Behavioral segmentation** : Create dynamic user lists based on specific checkout actions, such as items added to the cart, coupon codes used, or total purchase value.
* **Personalize user communication** : Use data from completed orders, such as product names, order value, and discount codes, to personalize marketing messages and product recommendations.
### Sync Modules
The following table outlines the event and user data that are synced in real-time from Shopflo to MoEngage:
| Event Type | Event Name | Description |
| ------------------ | ----------------------- | -------------------------------------------------------------------------------------------------------------------------------- |
| Checkout Event | Address submitted | This event is tracked when a user submits their address and contact details. |
| Checkout Event | Payment method selected | This event is tracked when a user chooses a payment option. |
| Checkout Event | Order Completed | This event is tracked when a user successfully completes a purchase. |
| User Profile Event | Address submitted | When the Address Submitted event is tracked, the associated user information is used to add or update user profiles in MoEngage. |
# Integration
**Prerequisites**
Ensure you have access to the Shopflo dashboard.
## Step 1: Get Your MoEngage API Credentials
To get your MoEngage API credentials, perform the following steps:
1. On the left navigation menu in the MoEngage UI, go to **Settings** > **Account** > **APIs**.
2. On the **API** page, copy the following credentials:
1. Copy the ID under **Workspace ID** (**earlier app id**).
2. Copy the **Data** under **API keys**.
3. **Data Center** : Find your data center code from your dashboard's URL. The following table describes the data center name and URL:
| Data Center Name | Dashboard URL |
| ---------------- | ----------------------------------------------------------------------------------------------------------------------------------------------------------------------- |
| DC-01 | [https://dashboard-01.moengage.com](https://dashboard-01.moengage.com) |
| DC-02 | [https://dashboard-02.moengage.com](https://dashboard-02.moengage.com) |
| DC-03 | [https://dashboard-03.moengage.com](https://dashboard-03.moengage.com) |
| DC-04 | [https://dashboard-04.moengage.com](https://dashboard-04.moengage.com) |
| DC-05 | [https://dashboard-05.moengage.com](https://dashboard-05.moengage.com) |
| DC-06 | [https://dashboard-06.moengage.com](https://dashboard-06.moengage.com)
For more information, refer [here](/user-guide/data/key-concepts/data-centers-in-moengage). |
## Step 2: Configure the Integration in Shopflo
To configure the integration in Shopflow, perform the following steps:
1. Log in to your [Shopflo](https://dashboard.shopflo.co/settings/integrations?s_id=moengage) dashboard.
2. Navigate to **Settings** >**Integrations** > **Remarketing** > **MoEngage**.
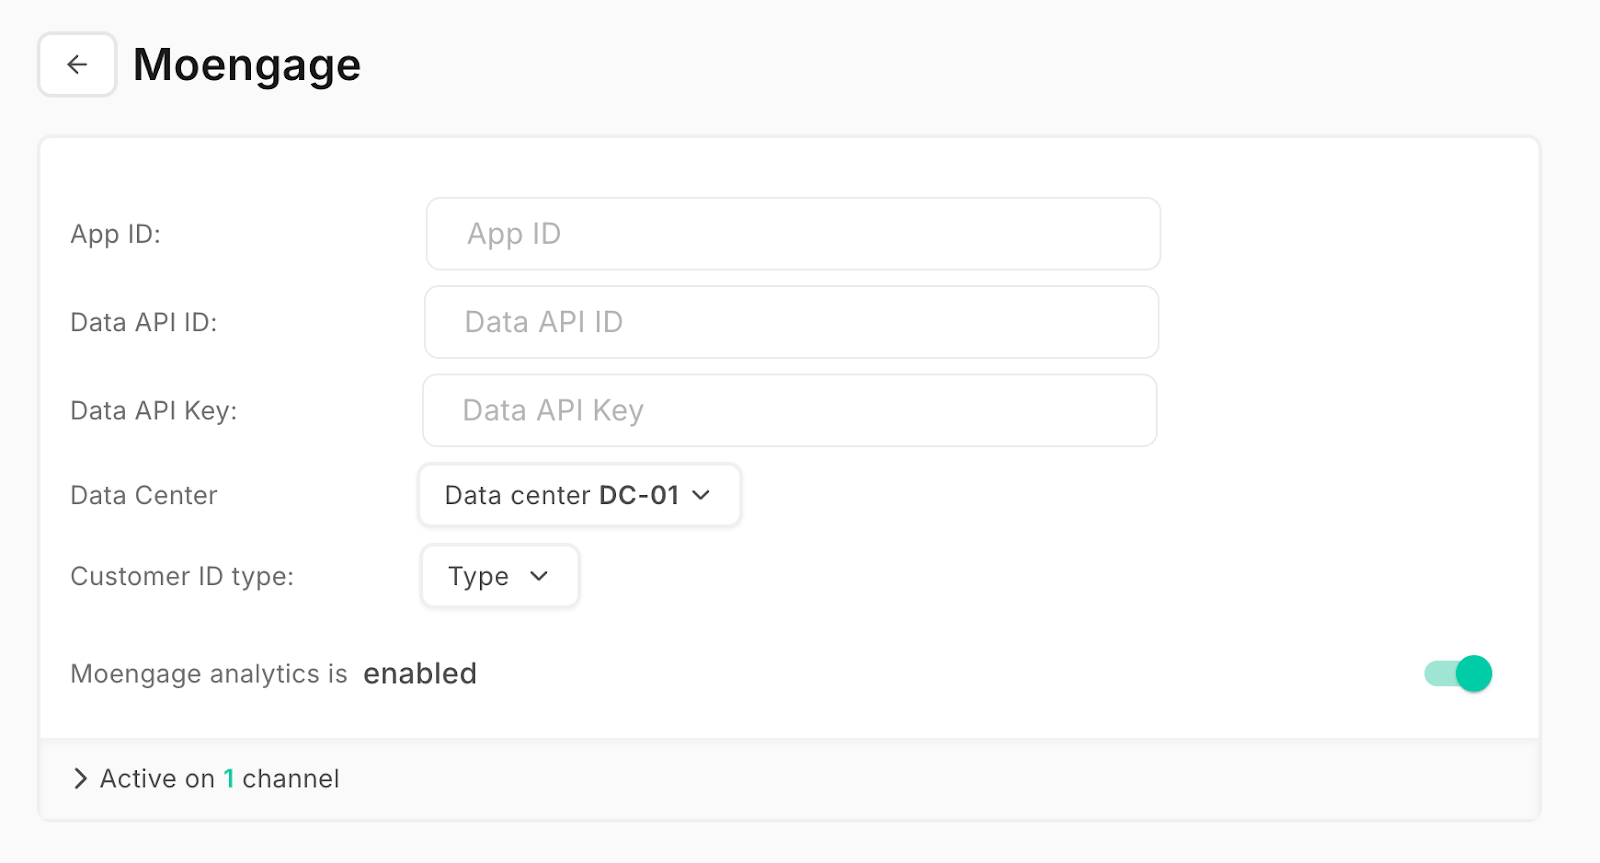
3. In the **Re-marketing** section, locate **MoEngage** in the list and click **Click to setup** to open the configuration panel. 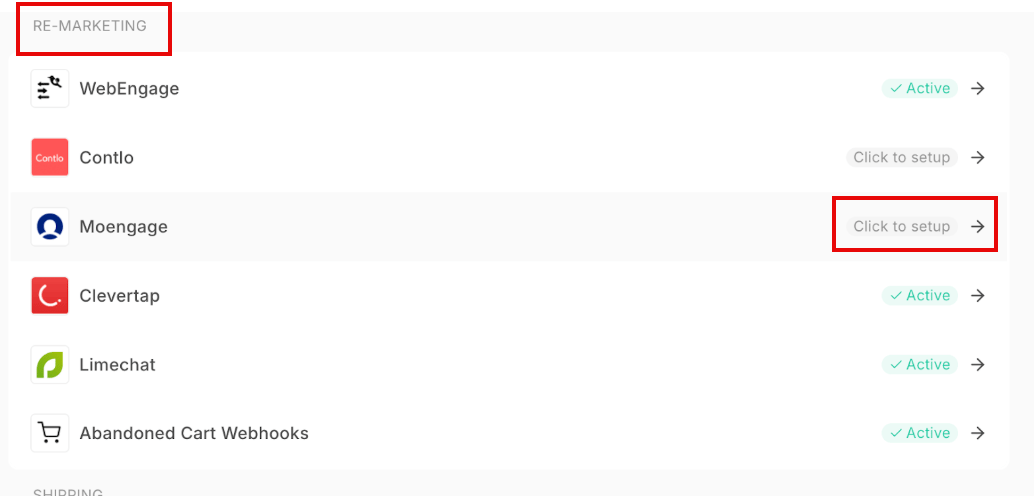 4. Enter the details that you copied in the [Get Your MoEngage API Credentials](/partner-guide/commerce-and-loyalty/e-commerce/shopflo#step-1-get-your-moengage-api-credentials).
5. In the **App ID** box, type your **Workspace ID**.
6. In the **Data API ID** box, type your **Workspace ID** again.
7. In the **Data API key** box, type your **Data API Key**.
8. In the **Data Center** list, select the data center.
9. In the **Customer ID type** list, select the identifier you use for users in MoEngage.
10. Turn the **MoEngage analytics is enabled** toggle on.
4. Enter the details that you copied in the [Get Your MoEngage API Credentials](/partner-guide/commerce-and-loyalty/e-commerce/shopflo#step-1-get-your-moengage-api-credentials).
5. In the **App ID** box, type your **Workspace ID**.
6. In the **Data API ID** box, type your **Workspace ID** again.
7. In the **Data API key** box, type your **Data API Key**.
8. In the **Data Center** list, select the data center.
9. In the **Customer ID type** list, select the identifier you use for users in MoEngage.
10. Turn the **MoEngage analytics is enabled** toggle on.
 ## Step 3: Verify the Setup
Shopflo automatically validates your credentials when you save them. To run a full end-to-end test of the data flow, perform the following steps:
1. Complete the order journey on your Shopflo store.
2. On the MoEngage UI, navigate to **Segments** > **Create segment** and search for your email ID.
3. Verify that the user profile is created or updated with the respective payloads in the MoEngage UI.
### Shopflo Events Sent to MoEngage
The Shopflo integration sends several key events to MoEngage to track the customer's journey through the checkout process. Each event includes a data payload with important attributes.
Shopflo sends data instantly, but there may be a short delay before it appears in your MoEngage UI.
#### Event: Address Submitted
This event is triggered after a user submits their shipping information and proceeds to the payment stage.
* **User Profile Sync** : This event creates or updates user profiles in MoEngage by syncing essential attributes like *First Name* , *Last Name* , *Phone* , and *Email*.
* **Abandoned Cart Recovery** : The payload includes a `checkoutURL` parameter, which is a unique link to the user's session. You can use this link in your campaigns to direct users back to their pre-filled checkout page.
#### Event: Address Submitted
This event is triggered after a user submits their shipping information and proceeds to the payment stage.
* **User Profile Sync** : This event creates or updates user profiles in MoEngage by syncing essential attributes like *First Name* , *Last Name* , *Phone* , and *Email*.
* **Abandoned Cart Recovery** : The payload includes a `checkoutURL` parameter, which is a unique link to the user's session. You can use this link in your campaigns to direct users back to their pre-filled checkout page.
**Payload Example** :
```json JSON wrap theme={null}
{
"line_items": ["41892488839333"],
"checkoutURL": "https://checkout.shopflo.co/?tokenId=88b4c6da9f534f38-bee2-8b706be2c0e0",
"login_type": "cookie_login"
}
```
#### Event: Payment Method Selected
This event is triggered when a user chooses a payment option (for example, UPI, Credit Card) during checkout.
**Payload Example** :
```json JSON wrap theme={null}
{
"checkoutURL": "https://checkout.shopflo.co/?tokenId=88b4c6da9f534f38-bee2-8b706be2c0e0",
"type": "cookie_login",
"method": "upi"
}
```
#### Event: Order Completed
This event is triggered when a user successfully completes a purchase. It contains detailed information about the final transaction.
**Payload Example** :
```json JSON theme={null}
{
"discount_value": "323.28",
"cart_token": "06a7c28f-6d5-4c08-a54-f0728af76",
"shipping_address_province": "Uttar pradesh",
"shipping_address_zip": "281121",
"first_name": "John",
"order_id": "5190263734503",
"currency": "INR",
"total_price": "1023.72",
"last_name": "Doe",
"discount_codes": ["GUNEET20", "PREPAID"],
"line_items": ["8056809390311", "8084034322663"],
"shipping_address_country": "India",
"tyPageURL": "brand.myshopify.com/orders/45676542/hgfd658798",
"shipping_address_city": "Vrindavan",
"buyer_accepts_marketing": true
}
```
## Step 3: Verify the Setup
Shopflo automatically validates your credentials when you save them. To run a full end-to-end test of the data flow, perform the following steps:
1. Complete the order journey on your Shopflo store.
2. On the MoEngage UI, navigate to **Segments** > **Create segment** and search for your email ID.
3. Verify that the user profile is created or updated with the respective payloads in the MoEngage UI.
### Shopflo Events Sent to MoEngage
The Shopflo integration sends several key events to MoEngage to track the customer's journey through the checkout process. Each event includes a data payload with important attributes.
Shopflo sends data instantly, but there may be a short delay before it appears in your MoEngage UI.
#### Event: Address Submitted
This event is triggered after a user submits their shipping information and proceeds to the payment stage.
* **User Profile Sync** : This event creates or updates user profiles in MoEngage by syncing essential attributes like *First Name* , *Last Name* , *Phone* , and *Email*.
* **Abandoned Cart Recovery** : The payload includes a `checkoutURL` parameter, which is a unique link to the user's session. You can use this link in your campaigns to direct users back to their pre-filled checkout page.
#### Event: Address Submitted
This event is triggered after a user submits their shipping information and proceeds to the payment stage.
* **User Profile Sync** : This event creates or updates user profiles in MoEngage by syncing essential attributes like *First Name* , *Last Name* , *Phone* , and *Email*.
* **Abandoned Cart Recovery** : The payload includes a `checkoutURL` parameter, which is a unique link to the user's session. You can use this link in your campaigns to direct users back to their pre-filled checkout page.
**Payload Example** :
```json JSON wrap theme={null}
{
"line_items": ["41892488839333"],
"checkoutURL": "https://checkout.shopflo.co/?tokenId=88b4c6da9f534f38-bee2-8b706be2c0e0",
"login_type": "cookie_login"
}
```
#### Event: Payment Method Selected
This event is triggered when a user chooses a payment option (for example, UPI, Credit Card) during checkout.
**Payload Example** :
```json JSON wrap theme={null}
{
"checkoutURL": "https://checkout.shopflo.co/?tokenId=88b4c6da9f534f38-bee2-8b706be2c0e0",
"type": "cookie_login",
"method": "upi"
}
```
#### Event: Order Completed
This event is triggered when a user successfully completes a purchase. It contains detailed information about the final transaction.
**Payload Example** :
```json JSON theme={null}
{
"discount_value": "323.28",
"cart_token": "06a7c28f-6d5-4c08-a54-f0728af76",
"shipping_address_province": "Uttar pradesh",
"shipping_address_zip": "281121",
"first_name": "John",
"order_id": "5190263734503",
"currency": "INR",
"total_price": "1023.72",
"last_name": "Doe",
"discount_codes": ["GUNEET20", "PREPAID"],
"line_items": ["8056809390311", "8084034322663"],
"shipping_address_country": "India",
"tyPageURL": "brand.myshopify.com/orders/45676542/hgfd658798",
"shipping_address_city": "Vrindavan",
"buyer_accepts_marketing": true
}
```